どうも、Tです。
プライベートコンテナリポジトリとしてHarborをデプロイした備忘録です。
目次
環境
Oracle Linux 10
# cat /etc/redhat-release
Red Hat Enterprise Linux release 10.0 (CentOS Stream)
# uname -a
Linux k-harbor.k.local.lab 6.12.0-100.28.2.el10uek.x86_64 #1 SMP PREEMPT_DYNAMIC Mon May 19 19:28:24 PDT 2025 x86_64 GNU/Linux
K3s
# k3s --version
k3s version v1.32.6+k3s1 (eb603acd)
go version go1.23.10
Helm
# helm version
version.BuildInfo{Version:"v3.18.4", GitCommit:"d80839cf37d860c8aa9a0503fe463278f26cd5e2", GitTreeState:"clean", GoVersion:"go1.24.4"}
Harbor
# helm list --namespace harbor-system
NAME    NAMESPACE       REVISION        UPDATED                                 STATUS          CHART           APP VERSION
harbor  harbor-system   1               2025-07-24 13:48:19.749107727 +0900 JST deployed        harbor-1.17.1   2.13.1
やりたいこと
コンテナイメージを保存する必要があり、コンテナレジストリが必要になりました。
SaaSやクラウド型のコンテナレジストリも多数ありますが、無料枠で使おうとすると保存容量やデータ転送などに制限があるなど制約があり、検証用で好き勝手使えるようにオンプレにプライベートコンテナレジストリを作ることにしました。
オンプレで無料で使えるものコンテナレジストリとして、有名どころで下記2つがありました。
- Docker Registry
- Harbor
Docker Registryは、比較的お手軽に使えそうでしたが、コンテナイメージの管理画面がなくコマンド操作になるため、管理画面やその他多くの機能も備えているHarborを採用しました。
Harborについては下記にわかりやすく説明されています。


Harborのデプロイ方法は下記2通りあります。
- Docker Composeを仕様してDockerにデプロイする
- Helmを使用してKubernetesにデプロイする
Dockerへのデプロイはかなり面倒そうだったので、今回は後者のHelmを用いてKubernetesにデプロイしていきます。


なお、今回はとりあえず検証用として、コンテナレジストリを利用できれば良いためセキュリティやデータの永続化については考えず、一番簡単と思われる構成にしています。
事前準備
ホストOSの設定
ホストとなるOracle Linux 10を最小構成でインストールした後、下記の設定を行っています。
SELinux無効化
SELinuxを無効にし、OS再起動で反映します。
# sudo grubby --update-kernel ALL --args selinux=0

# reboot
SELinuxが無効であることを確認します。
# getenforce
Disabled
Firewalld無効化
Firewalldの自動起動を無効にし、停止します。
# systemctl disable --now firewalld
Firewalldが停止していることを確認します。
# systemctl status firewalld
○ firewalld.service - firewalld - dynamic firewall daemon
Loaded: loaded (/usr/lib/systemd/system/firewalld.service; disabled; preset: enabled)
Active: inactive (dead)
Docs: man:firewalld(1)
Harborの要件について
Helmを用いたデプロイの要件としては、下記があります。今回は簡易的な構成のためKubernetes clusterとHelmバージョンを気にしておけば大丈夫だと思います。


Prerequisites
- Kubernetes cluster 1.10+
- Helm 2.8.0+
- High available ingress controller (Harbor does not manage the external endpoint)
- High available PostgreSQL 9.6+ (Harbor does not handle the deployment of HA of database)
- High available Redis (Harbor does not handle the deployment of HA of Redis)
- PVC that can be shared across nodes or external object storage
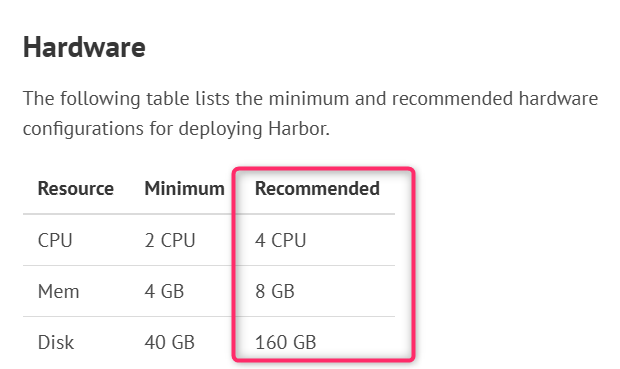
また、Dockerにインストールする際の要件になりますが、Harborが多機能のためかハードウェア要件が高いです。今回は、ホストOSにRecommended程度のリソースを割り当てています。


K3sインストール
HarborのためにKubernetesを準備するのは大変なので、今回は簡易に利用できるK3sを利用することにしました。
下記を参考にK3sをインストールします。


下記の環境変数を設定しSELinux関連のパッケージがインストールされないようにします。
# export INSTALL_K3S_SKIP_SELINUX_RPM=true
デフォルトでインストールを進めるとSELinux関連のパッケージをインストールするよう促されますが、実行するとエラーでインストールできませんでした。
[ERROR] Failed to apply container_runtime_exec_t to /usr/local/bin/k3s, please install:
dnf install -y container-selinux
dnf install -y https://rpm.rancher.io/k3s/stable/common/centos/9/noarch/
↓
# dnf install -y https://rpm.rancher.io/k3s/stable/common/centos/9/noarch/
メタデータの期限切れの最終確認: 0:00:56 前の 2025年07月24日 12時13分32秒 に実施しました。
[MIRROR] : Status code: 404 for https://rpm.rancher.io/k3s/stable/common/centos/9/noarch/ (IP: 172.67.74.104)
[MIRROR] : Status code: 404 for https://rpm.rancher.io/k3s/stable/common/centos/9/noarch/ (IP: 172.67.74.104)
[MIRROR] : Status code: 404 for https://rpm.rancher.io/k3s/stable/common/centos/9/noarch/ (IP: 172.67.74.104)
[MIRROR] : Status code: 404 for https://rpm.rancher.io/k3s/stable/common/centos/9/noarch/ (IP: 172.67.74.104)
[FAILED] : Status code: 404 for https://rpm.rancher.io/k3s/stable/common/centos/9/noarch/ (IP: 172.67.74.104)
Status code: 404 for https://rpm.rancher.io/k3s/stable/common/centos/9/noarch/ (IP: 172.67.74.104)
K3sをインストールします。
# curl -sfL https://get.k3s.io | K3S_KUBECONFIG_MODE="644" sh -s
「K3S_KUBECONFIG_MODE=”644″」を指定することで、rootユーザー以外でもkubectlコマンドを実行できるようになります。
上記オプションなしでインストール後、rootユーザー以外でkubectlコマンドを実行しようとすると下記のエラーがでます。
$ kubectl get nodes
WARN[0000] Unable to read /etc/rancher/k3s/k3s.yaml, please start server with --write-kubeconfig-mode or --write-kubeconfig-group to modify kube config permissions
error: error loading config file "/etc/rancher/k3s/k3s.yaml": open /etc/rancher/k3s/k3s.yaml: permission denied
K3sが起動していることを確認します。(デフォルトで自動起動は有効になります)
]# systemctl status k3s
● k3s.service - Lightweight Kubernetes
     Loaded: loaded (/etc/systemd/system/k3s.service; enabled; preset: disabled)
     Active: active (running) since Thu 2025-07-24 12:15:09 JST; 3s ago
 Invocation: 9789d41ac8cd452694afa088cbac8419
       Docs: https://k3s.io
    Process: 1783 ExecStartPre=/bin/sh -xc ! /usr/bin/systemctl is-enabled --quiet nm-cloud-setup.service 2>/dev/null (>
    Process: 1785 ExecStartPre=/sbin/modprobe br_netfilter (code=exited, status=0/SUCCESS)
    Process: 1788 ExecStartPre=/sbin/modprobe overlay (code=exited, status=0/SUCCESS)
   Main PID: 1791 (k3s-server)
      Tasks: 26
     Memory: 515.5M (peak: 515.5M)
        CPU: 9.942s
     CGroup: /system.slice/k3s.service
             ├─1791 "/usr/local/bin/k3s server"
             └─1813 "containerd "
下記のファイルパーミッションが644であることを確認します。
# ls -lha /etc/rancher/k3s/k3s.yaml
-rw-r--r-- 1 root root 2.9K 7月 24 12:15 /etc/rancher/k3s/k3s.yaml
ノードのステータスがReadyであることを確認します。なお、ここのNAMEは、OSのホスト名です。
# kubectl get nodes
NAME                   STATUS   ROLES                  AGE   VERSION
k-harbor.k.local.lab   Ready    control-plane,master   50s   v1.32.6+k3s1
Helmインストール
Helmは、Kubernetesのパッケージマネージャーです。
下記を参考にHelmをインストールします。

Helmをインストールするために必要なパッケージをインストールします。
# dnf install git openssl tar
Helmインストール作業に利用する作業用ディレクトリを作成して移動します。
# mkdir -p /root/work/helm
# cd /root/work/helm
Helmのインストールスクリプトをダウンロードし、スクリプトファイルがダウンロードできたことを確認します。
# curl -fsSL -o get_helm.sh https://raw.githubusercontent.com/helm/helm/main/scripts/get-helm-3
# ls -lh
合計 12K
-rw-r--r-- 1 root root 12K 7月 24 12:26 get_helm.sh
実行権限を付けて、インストールスクリプトを実行します。
# chmod 700 get_helm.sh
# ./get_helm.sh
Downloading https://get.helm.sh/helm-v3.18.4-linux-amd64.tar.gz
Verifying checksum... Done.
Preparing to install helm into /usr/local/bin
helm installed into /usr/local/bin/helm
Helmがインストールされたことを確認します。
# helm version
version.BuildInfo{Version:"v3.18.4", GitCommit:"d80839cf37d860c8aa9a0503fe463278f26cd5e2", GitTreeState:"clean", GoVersion:"go1.24.4"}
Harborデプロイ
下記を参考にHelmを用いて、Harborをデプロイします。
helmのチャートリポジトリの登録
HelmはHemlチャートと呼ばれる定義ファイルとデプロイ用のパッケージングされたファイルに基づいてアプリケーションをデプロイします。HarborのHemlチャートが取得できるように、チャートリポジトリを登録します。
Harborのチャートリポジトリを登録し、リポジトリが表示されることを確認します。
# helm repo add harbor https://helm.goharbor.io
"harbor" has been added to your repositories

# helm repo list
NAME    URL
harbor  https://helm.goharbor.io
念のためリポジトリをアップデートします。
# helm repo update
Hang tight while we grab the latest from your chart repositories...
...Successfully got an update from the "harbor" chart repository
Update Complete. ⎈Happy Helming!⎈
Harborのチャート取得
HarborのHemlチャート作業に利用する作業ディレクトリを作成して移動します。
# mkdir -p /root/work/harbor
# cd /root/work/harbor
harborレジストリ/harborチャートを取得します。取得したディレクトリはharborになるので、ファイルが取得できていることを確認します。
# helm pull harbor/harbor --untar
# ls -lh
合計 0
drwxr-xr-x 3 root root 111 7月 24 12:36 harbor
# ls -lh harbor/
合計 248K
-rw-r--r-- 1 root root 637 7月 24 12:36 Chart.yaml
-rw-r--r-- 1 root root 12K 7月 24 12:36 LICENSE
-rw-r--r-- 1 root root 190K 7月 24 12:36 README.md
drwxr-xr-x 14 root root 220 7月 24 12:36 templates
-rw-r--r-- 1 root root 39K 7月 24 12:36 values.yaml
設定値修正
デプロイに必要となる設定値を修正します。
バックアップファイルを取得して編集していきます。
# cd harbor/
# cp -p values.yaml values.yaml.yyyymmdd
# vi values.yaml
下記の値を修正していきます。
---変更前
type: ingress
---変更後
type: nodePort
---変更前
commonName: ""
---変更後
commonName: "192.168.10.208"
---変更前
externalURL: https://core.harbor.domain
---変更後
externalURL: https://192.168.10.208:30003
diffで確認すると下記のようになります。
# diff -u values.yaml.20250724 values.yaml
--- values.yaml.20250724        2025-07-24 12:36:02.816063904 +0900
+++ values.yaml 2025-07-24 13:46:21.321986139 +0900
@@ -1,7 +1,7 @@
 expose:
   # Set how to expose the service. Set the type as "ingress", "clusterIP", "nodePort" or "loadBalancer"
   # and fill the information in the corresponding section
-  type: ingress
+  type: nodePort
   tls:
     # Enable TLS or not.
     # Delete the "ssl-redirect" annotations in "expose.ingress.annotations" when TLS is disabled and "expose.type" is "ingress"
@@ -20,7 +20,7 @@
     auto:
       # The common name used to generate the certificate, it's necessary
       # when the type isn't "ingress"
-      commonName: ""
+      commonName: "192.168.10.208"
     secret:
       # The name of secret which contains keys named:
       # "tls.crt" - the certificate
@@ -109,7 +109,7 @@
 # the IP address of k8s node
 #
 # If Harbor is deployed behind the proxy, set it as the URL of proxy
-externalURL: https://core.harbor.domain
+externalURL: https://192.168.10.208:30003

 # The persistence is enabled by default and a default StorageClass
 # is needed in the k8s cluster to provision volumes dynamically.
Namespaceの追加
Harborデプロイ先となるK3sの任意の名前のNamespaceを作成し、作成されたことを確認します。
# kubectl create namespace harbor-system
namespace/harbor-system created

# kubectl get namespace
NAME              STATUS   AGE
default           Active   52m
harbor-system     Active   5s
kube-node-lease   Active   52m
kube-public       Active   52m
kube-system       Active   52m
環境変数(KUBECONFIG)設定
下記の環境変数を設定し、heml listコマンドで結果が表示できることを確認します。
# export KUBECONFIG=/etc/rancher/k3s/k3s.yaml

# helm list --all-namespaces
NAME            NAMESPACE       REVISION        UPDATED                                 STATUS          CHART                           APP VERSION
traefik         kube-system     1               2025-07-24 03:15:30.22891252 +0000 UTC  deployed        traefik-34.2.1+up34.2.0         v3.3.2
traefik-crd     kube-system     1               2025-07-24 03:15:28.719047403 +0000 UTC deployed        traefik-crd-34.2.1+up34.2.0     v3.3.2
K3s環境では、helmから設定ファイルが認識できずhemlコマンドを実行すると下記のエラーが発生します。
Error: Kubernetes cluster unreachable: Get "http://localhost:8080/version": dial tcp [::1]:8080: connect: connection refused
今回は、インストール時のみ回避するためexportで環境変数を設定していますが、今後hemlコマンドを利用する場合は、.basrcあたりに下記の設定を入れておいてください。
export KUBECONFIG=/etc/rancher/k3s/k3s.yaml
Harborのデプロイ
Harborをデプロイしてきます。
作業用ディレクトリに移動し、デプロイのコマンドを実行します。
# cd /root/work/harbor/
# helm install harbor --namespace harbor-system -f ./harbor/values.yaml harbor/harbor
NAME: harbor
LAST DEPLOYED: Thu Jul 24 13:48:19 2025
NAMESPACE: harbor-system
STATUS: deployed
REVISION: 1
TEST SUITE: None
NOTES:
Please wait for several minutes for Harbor deployment to complete.
Then you should be able to visit the Harbor portal at https://192.168.10.208:30003
For more details, please visit https://github.com/goharbor/harbor
少しわかりにくいのでコマンドの意味を記載します。
| コマンド部分 | 意味 |
|---|---|
| helm install | Helmチャートを使ってデプロイする |
| harbor | リリース名。helm list で表示される名前。 |
| –namespace harbor-system | K3sで作成したNamespace。 |
| -f ./harbor/values.yaml | チャートの設定ファイルを指定。 |
| harbor/harbor | harbborリポジトリのharborチャートを利用する指定。 |
デプロイ状況の確認
harborがデプロイされていることを確認します。
# helm list --namespace harbor-system
NAME    NAMESPACE       REVISION        UPDATED                                 STATUS          CHART           APP VERSION
harbor  harbor-system   1               2025-07-24 13:48:19.749107727 +0900 JST deployed        harbor-1.17.1   2.13.1
harborに関するpodなどのオブジェクトが多数デプロイされています。
# kubectl get all --namespace harbor-system
NAME                                     READY   STATUS    RESTARTS        AGE
pod/harbor-core-67bc47b787-wg9bc         1/1     Running   0               4m59s
pod/harbor-database-0                    1/1     Running   0               4m59s
pod/harbor-jobservice-6b87b6c7f5-dt29p   1/1     Running   2 (4m56s ago)   4m59s
pod/harbor-nginx-6c9f69989f-gzpnq        1/1     Running   0               4m59s
pod/harbor-portal-7ff4ddcbbb-xvlpf       1/1     Running   0               4m59s
pod/harbor-redis-0                       1/1     Running   0               4m59s
pod/harbor-registry-57d4479579-gl2jw     2/2     Running   0               4m59s
pod/harbor-trivy-0                       1/1     Running   0               4m59s

NAME                        TYPE        CLUSTER-IP     EXTERNAL-IP   PORT(S)                      AGE
service/harbor              NodePort    10.43.50.158           80:30002/TCP,443:30003/TCP   4m59s
service/harbor-core         ClusterIP   10.43.26.120           80/TCP                       4m59s
service/harbor-database     ClusterIP   10.43.32.249           5432/TCP                     4m59s
service/harbor-jobservice   ClusterIP   10.43.45.253           80/TCP                       4m59s
service/harbor-portal       ClusterIP   10.43.51.111           80/TCP                       4m59s
service/harbor-redis        ClusterIP   10.43.14.36            6379/TCP                     4m59s
service/harbor-registry     ClusterIP   10.43.64.96            5000/TCP,8080/TCP            4m59s
service/harbor-trivy        ClusterIP   10.43.250.30           8080/TCP                     4m59s

NAME                                READY   UP-TO-DATE   AVAILABLE   AGE
deployment.apps/harbor-core         1/1     1            1           4m59s
deployment.apps/harbor-jobservice   1/1     1            1           4m59s
deployment.apps/harbor-nginx        1/1     1            1           4m59s
deployment.apps/harbor-portal       1/1     1            1           4m59s
deployment.apps/harbor-registry     1/1     1            1           4m59s

NAME                                           DESIRED   CURRENT   READY   AGE
replicaset.apps/harbor-core-67bc47b787         1         1         1       4m59s
replicaset.apps/harbor-jobservice-6b87b6c7f5   1         1         1       4m59s
replicaset.apps/harbor-nginx-6c9f69989f        1         1         1       4m59s
replicaset.apps/harbor-portal-7ff4ddcbbb       1         1         1       4m59s
replicaset.apps/harbor-registry-57d4479579     1         1         1       4m59s

NAME                               READY   AGE
statefulset.apps/harbor-database   1/1     4m59s
statefulset.apps/harbor-redis      1/1     4m59s
statefulset.apps/harbor-trivy      1/1     4m59s
確認
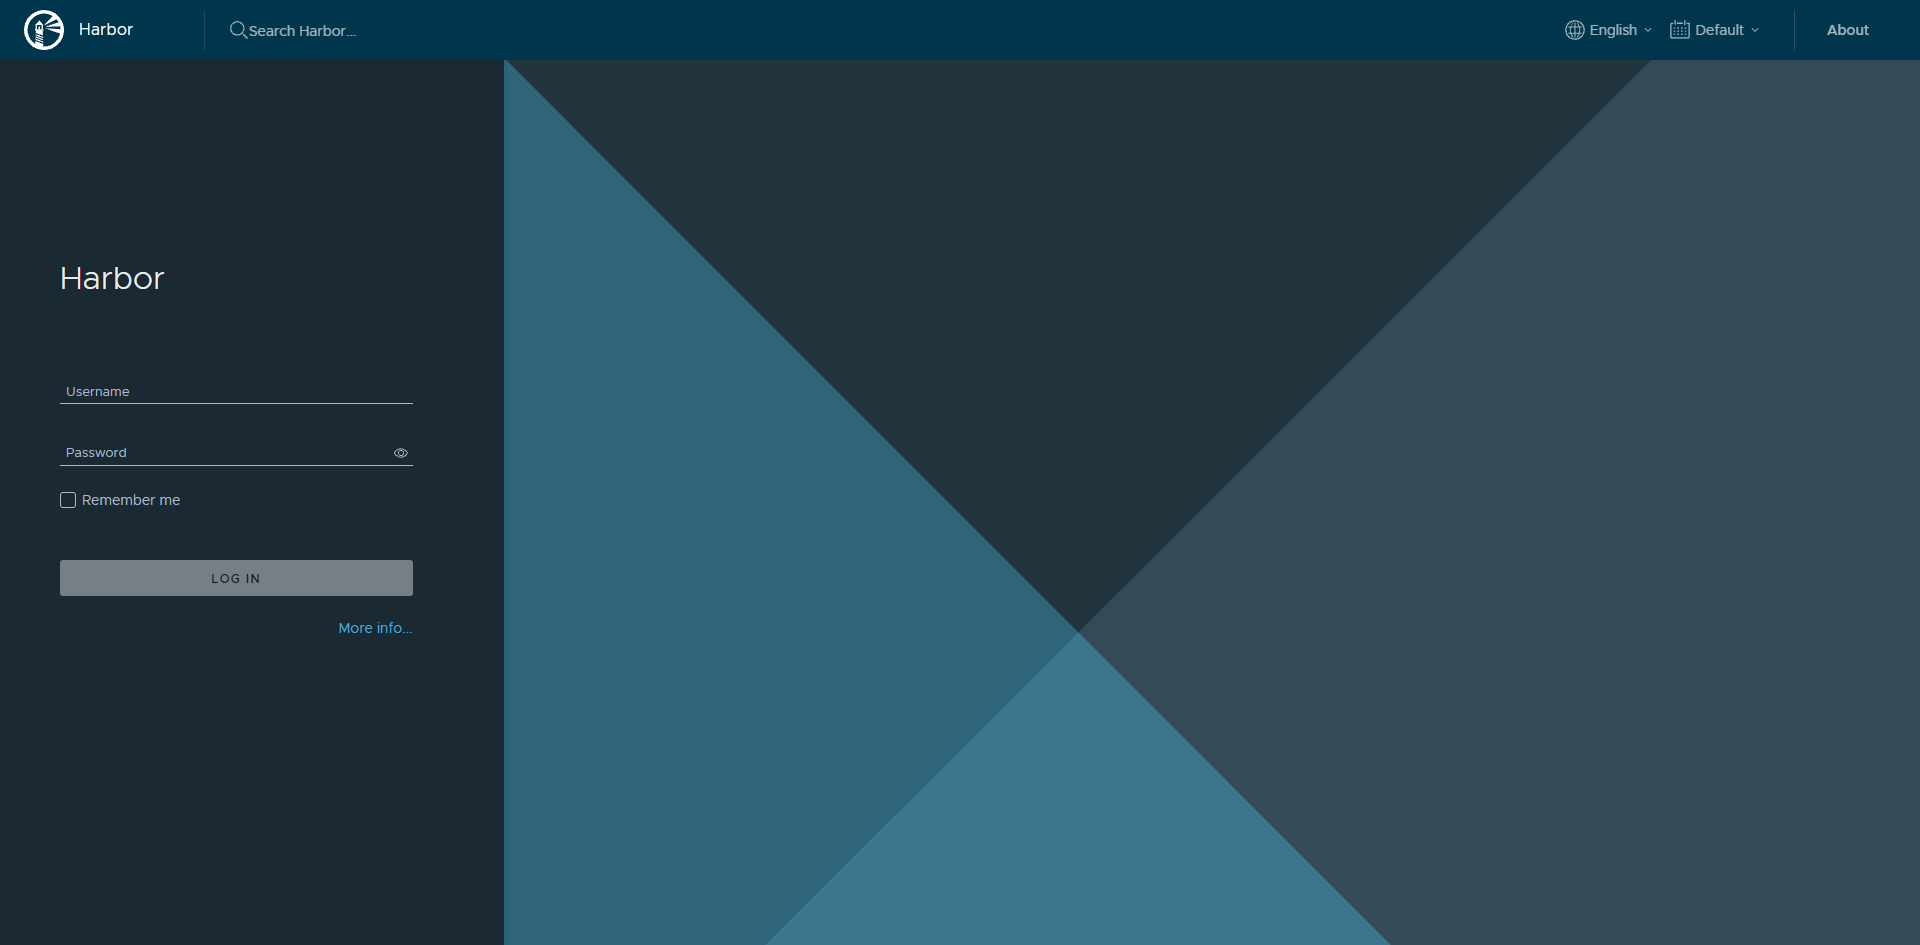
externalURLに指定したURLでアクセスします。
https://192.168.10.208:30003
下記を入力しログインします。
- Username:admin
- Password:Harbor12345
初期パスワードは、values.yamlの下記に記載されています。
# The initial password of Harbor admin. Change it from portal after launching Harbor
# or give an existing secret for it
# key in secret is given via (default to HARBOR_ADMIN_PASSWORD)
# existingSecretAdminPassword:
existingSecretAdminPasswordKey: HARBOR_ADMIN_PASSWORD
harborAdminPassword: "Harbor12345"
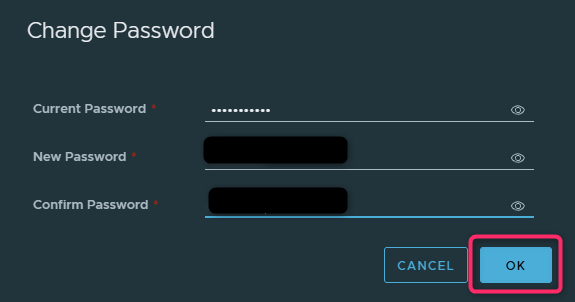
初期パスワードを変更しておきます。画面右上の「admin」->「Change Password」をクリックします。
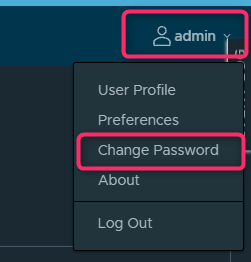
新しいパスワードを入力し「OK」をクリックします。
参考


まとめ
Helmを使うのは初めてでしたが、設定箇所を抑えておけば簡単にデプロイできました。