どうも、Tです。
WordPressの検証が必要になり、簡単なところはローカルで行いたいのでインストール方法についてまとめてみました。
事前準備
とりあえず、OSの下記まで準備してます。詳細は割愛。
- CentOS最小インストール
- IPアドレス設定
- Firewall無効化
- SELinux無効化
- 本記事の操作はrootで実施
環境
各種バージョン
それぞれのバージョンは、下記で作成しました。
- OS:release 7.5.1804 (Core)
- Web(apache):2.4.6-80.el7.centos.1
- PHP:7.3.0~rc5-1.el7
- MariaDB:10.3.10-1.el7.centos
- WordPress:4.9.8
サーバースペック
検証なのでとりあえず省エネ構成で。
- マシン:仮想マシン
- CPU:1コア
- メモリ:1GB
- ディスク:20GB
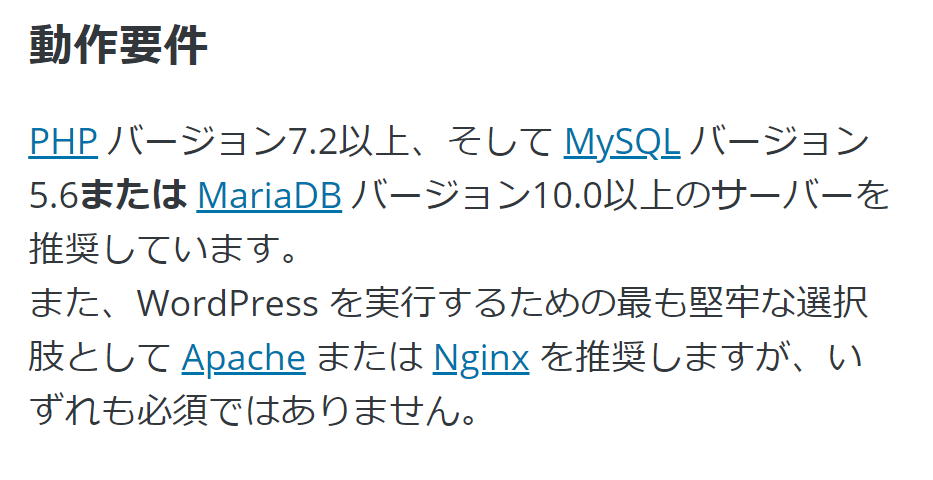
WordPress推奨確認
まともにWordPressインストールするのは初めてだったので、とりあえず推奨構成を確認しました。


ほぼ最新版使えって感じですね。CentOSの標準リポジトリで賄えないので少々面倒です。
Apache HTTP
インストール
WebサーバーのApache HTTPをインストールします。
# yum install httpd
インストールできました。
インストール:
  httpd.x86_64 0:2.4.6-80.el7.centos.1

依存性関連をインストールしました:
  apr.x86_64 0:1.4.8-3.el7_4.1        apr-util.x86_64 0:1.5.2-6.el7       httpd-tools.x86_64 0:2.4.6-80.el7.centos.1
  mailcap.noarch 0:2.1.41-2.el7

完了しました!
設定
とりあえず、最低限の設定だけします。
外部に出さないので、localhostで設定。
# vi /etc/httpd/conf/httpd.conf

#ServerName www.example.com:80
ServerName localhost:80    #設定
自動で起動するように設定します。
# systemctl enable httpd
Created symlink from /etc/systemd/system/multi-user.target.wants/httpd.service to /usr/lib/systemd/system/httpd.service.
デフォルトで止まっているので起動します。
# systemctl start httpd
デーモンが起動していることを確認します。
# systemctl status httpd
● httpd.service - The Apache HTTP Server
   Loaded: loaded (/usr/lib/systemd/system/httpd.service; enabled; vendor preset: disabled)
   Active: active (running) since 木 2018-11-08 02:23:13 JST; 47s ago
確認
Webブラウザからアクセスして、接続できることを確認します。
下記のテストページが表示されればOKです。
![]()
MariaDB
インストール
公式のリポジトリからyumを使って最新版をインストールします。
公式サイトに導入手順があるので見ておきます。


repository generatorなるものがあるので、yumの設定ファイルも簡単に出力できます。


MariaDBのyum設定ファイルを作成します。
# vi /etc/yum.repos.d/MariaDB.repo

[mariadb]
name = MariaDB
baseurl = http://yum.mariadb.org/10.3/centos7-amd64
gpgkey=https://yum.mariadb.org/RPM-GPG-KEY-MariaDB
gpgcheck=1
MariaDBをインストールします。
# yum install MariaDB-server MariaDB-client

#―省略―
インストール:
  MariaDB-client.x86_64 0:10.3.10-1.el7.centos          MariaDB-compat.x86_64 0:10.3.10-1.el7.centos          MariaDB-server.x86_64 0:10.3.10-1.el7.centos

依存性関連をインストールしました:
  MariaDB-common.x86_64 0:10.3.10-1.el7.centos          boost-program-options.x86_64 0:1.53.0-27.el7          galera.x86_64 0:25.3.24-1.rhel7.el7.centos
  lsof.x86_64 0:4.87-5.el7                              perl.x86_64 4:5.16.3-292.el7                          perl-Carp.noarch 0:1.26-244.el7
  perl-Compress-Raw-Bzip2.x86_64 0:2.061-3.el7          perl-Compress-Raw-Zlib.x86_64 1:2.061-4.el7           perl-DBI.x86_64 0:1.627-4.el7
  perl-Data-Dumper.x86_64 0:2.145-3.el7                 perl-Encode.x86_64 0:2.51-7.el7                       perl-Exporter.noarch 0:5.68-3.el7
  perl-File-Path.noarch 0:2.09-2.el7                    perl-File-Temp.noarch 0:0.23.01-3.el7                 perl-Filter.x86_64 0:1.49-3.el7
  perl-Getopt-Long.noarch 0:2.40-3.el7                  perl-HTTP-Tiny.noarch 0:0.033-3.el7                   perl-IO-Compress.noarch 0:2.061-2.el7
  perl-Net-Daemon.noarch 0:0.48-5.el7                   perl-PathTools.x86_64 0:3.40-5.el7                    perl-PlRPC.noarch 0:0.2020-14.el7
  perl-Pod-Escapes.noarch 1:1.04-292.el7                perl-Pod-Perldoc.noarch 0:3.20-4.el7                  perl-Pod-Simple.noarch 1:3.28-4.el7
  perl-Pod-Usage.noarch 0:1.63-3.el7                    perl-Scalar-List-Utils.x86_64 0:1.27-248.el7          perl-Socket.x86_64 0:2.010-4.el7
  perl-Storable.x86_64 0:2.45-3.el7                     perl-Text-ParseWords.noarch 0:3.29-4.el7              perl-Time-HiRes.x86_64 4:1.9725-3.el7
  perl-Time-Local.noarch 0:1.2300-2.el7                 perl-constant.noarch 0:1.27-2.el7                     perl-libs.x86_64 4:5.16.3-292.el7
  perl-macros.x86_64 4:5.16.3-292.el7                   perl-parent.noarch 1:0.225-244.el7                    perl-podlators.noarch 0:2.5.1-3.el7
  perl-threads.x86_64 0:1.87-4.el7                      perl-threads-shared.x86_64 0:1.43-6.el7               rsync.x86_64 0:3.1.2-4.el7

置換:
  mariadb-libs.x86_64 1:5.5.56-2.el7

完了しました!
設定
自動起動設定と手動起動をしておきます。
# systemctl enable mariadb        #自動起動設定
# systemctl start mariadb         #手動起動
起動状態を確認します。
# systemctl status mariadb
● mariadb.service - MariaDB 10.3.10 database server
   Loaded: loaded (/usr/lib/systemd/system/mariadb.service; enabled; vendor preset: disabled)
  Drop-In: /etc/systemd/system/mariadb.service.d
           mqmigrated-from-my.cnf-settings.conf
   Active: active (running) since 木 2018-11-08 02:52:50 JST; 1min 5s ago
初期設定をします。
# mysql_secure_installation

NOTE: RUNNING ALL PARTS OF THIS SCRIPT IS RECOMMENDED FOR ALL MariaDB
      SERVERS IN PRODUCTION USE!  PLEASE READ EACH STEP CAREFULLY!

In order to log into MariaDB to secure it, we'll need the current
password for the root user.  If you've just installed MariaDB, and
you haven't set the root password yet, the password will be blank,
so you should just press enter here.

Enter current password for root (enter for none):    #Enterで進む
OK, successfully used password, moving on...

Setting the root password ensures that nobody can log into the MariaDB
root user without the proper authorisation.

Set root password? [Y/n] Y      #DBのrootパスワードを設定
New password:                   #DBのrootパスワードを設定
Re-enter new password:          #DBのrootパスワードを設定
Password updated successfully!
Reloading privilege tables..
 ... Success!


By default, a MariaDB installation has an anonymous user, allowing anyone
to log into MariaDB without having to have a user account created for
them.  This is intended only for testing, and to make the installation
go a bit smoother.  You should remove them before moving into a
production environment.

Remove anonymous users? [Y/n] Y       #anonymousユーザー削除
 ... Success!

Normally, root should only be allowed to connect from 'localhost'.  This
ensures that someone cannot guess at the root password from the network.

Disallow root login remotely? [Y/n] Y #rootのリモート接続拒否
 ... Success!

By default, MariaDB comes with a database named 'test' that anyone can
access.  This is also intended only for testing, and should be removed
before moving into a production environment.

Remove test database and access to it? [Y/n] Y  #testDB削除
 - Dropping test database...
 ... Success!
 - Removing privileges on test database...
 ... Success!

Reloading the privilege tables will ensure that all changes made so far
will take effect immediately.

Reload privilege tables now? [Y/n] Y           #権限テーブルの読み込み
 ... Success!

Cleaning up...

All done!  If you've completed all of the above steps, your MariaDB
installation should now be secure.

Thanks for using MariaDB!
確認
MariaDBへログインできることを確認します。
# mysql -u root -p
Enter password:
Welcome to the MariaDB monitor.  Commands end with ; or \g.
Your MariaDB connection id is 19
Server version: 10.3.10-MariaDB MariaDB Server

Copyright (c) 2000, 2018, Oracle, MariaDB Corporation Ab and others.

Type 'help;' or '\h' for help. Type '\c' to clear the current input statement.

MariaDB [(none)]>
MariaDB [(none)]> quit;
Bye
PHP
インストール
PHPは、remiリポジトリを利用してyumで導入します。


yumの導入方法の案内があるので読んでおきます。


remiとEPELリポジトリの設定をします。
# yum install wget       #wgetが使えるようにインストール
# wget https://dl.fedoraproject.org/pub/epel/epel-release-latest-7.noarch.rpm
# wget https://rpms.remirepo.net/enterprise/remi-release-7.rpm
# rpm -Uvh remi-release-7.rpm epel-release-latest-7.noarch.rpm
PHPをインストールします。とりあえず必要な最小パッケージで導入。
7.3がまだGAじゃないのでRCを導入しました。
# yum install --enablerepo=remi-php73,epel php php-mysql php-mbstring

#―省略―
インストール:
  php.x86_64 0:7.3.0~rc5-1.el7.remi               php-mbstring.x86_64 0:7.3.0~rc5-1.el7.remi               php-mysqlnd.x86_64 0:7.3.0~rc5-1.el7.remi

依存性関連をインストールしました:
  libargon2.x86_64 0:20161029-2.el7      php-cli.x86_64 0:7.3.0~rc5-1.el7.remi  php-common.x86_64 0:7.3.0~rc5-1.el7.remi  php-json.x86_64 0:7.3.0~rc5-1.el7.remi
  php-pdo.x86_64 0:7.3.0~rc5-1.el7.remi

完了しました!
新しいPHPが導入されていることを確認します。
# php -v
PHP 7.3.0RC5 (cli) (built: Nov  6 2018 10:22:47) ( NTS )
Copyright (c) 1997-2018 The PHP Group
Zend Engine v3.3.0-dev, Copyright (c) 1998-2018 Zend Technologies
設定
基本的な部分だけ設定しておきます。
#タイムゾーンを設定
;date.timezone =
date.timezone = "Asia/Tokyo"

#言語を日本語に設定
;mbstring.language = Japanese
mbstring.language = Japanese

#文字コードをUTF-8に設定
;mbstring.internal_encoding =
mbstring.internal_encoding = UTF-8

#HTTPインプット時に文字コード変換なし
;mbstring.http_input =
mbstring.http_input = pass

#HTTPアウトプット時に文字コード変換なし
;mbstring.http_output =
mbstring.http_output = pass

#HTTP 入力変換を無効にする
;mbstring.encoding_translation = Off
mbstring.encoding_translation = Off

#文字エンコーディングの検出方式を自動
;mbstring.detect_order = auto
mbstring.detect_order = auto
Apache HTTPを再起動して設定を反映します。
# systemctl restart httpd
確認
PHP動作確認用のファイルを作成します。
# vi /var/www/html/index.php                         #確認ファイル作成
<?php
phpinfo();
?>

# chown apache:apache /var/www/html/index.php        #ファイルの所有者変更
# chmod 755 /var/www/html/index.php                  #ファイルの権限変更
Webブラウザからアクセスし、PHPの画面が表示されることを確認します。
![]()
WordPress
ダウンロード
https://ja.wordpress.org/からWordPress本体をダウンロードします。
![]()
![]()
ダウンロードしたファイルをサーバーの/tmpあたりにアップロードします。
WordPressのファイルを解凍します。
# tar -xzvf /tmp/wordpress-4.9.8-ja.tar.gz
中身をWebサーバーのDocumentRootにコピーします。
# cp -R /tmp/wordpress/* /var/www/html/              #ファイルコピー
# chown -R apache:apache /var/www/html/         #所有者変更
# chmod -R 755 /var/www/html/                   #権限変更
設定
インストールに必要な手順が公式で出ているので読んでおきます。
なんと5分でインストールできるそうです。早い。

WordPress用のDBとDBユーザーを作成します。
# mysql -u root -p               #DBへログイン
Enter password:
Welcome to the MariaDB monitor.  Commands end with ; or \g.
Your MariaDB connection id is 20
Server version: 10.3.10-MariaDB MariaDB Server

Copyright (c) 2000, 2018, Oracle, MariaDB Corporation Ab and others.

Type 'help;' or '\h' for help. Type '\c' to clear the current input statement.

MariaDB [(none)]> create database wpdb;    #DB作成
Query OK, 1 row affected (0.008 sec)

MariaDB [(none)]> grant all privileges on wpdb.* to wpuser@localhost identified by 'パスワード';   #DBユーザー作成
Query OK, 0 rows affected (0.015 sec)
MariaDB [(none)]> quit
Bye
インストール
Webブラウザで、ホスト/wp-admin/setup-config.phpに接続します。
![]()
下記の画面が表示されるので、セットアップ項目を確認して「さぁ、始めましょう」をクリックします。
![]()
すべての項目を入力して、「送信」をクリックします。
![]()
「インストール実行」をクリックします。
![]()
5分インストールがでてきました。
必要な項目を入力して「WordPressをインストール」をクリックします。
![]()
数秒で終わりました。「ログイン」をクリックします。
![]()
設定したユーザー情報を利用してログインします。
![]()
ログインできました。デフォルトってここまでシンプルだった・・・・。
![]()
確認
Webブラウザで接続して、WordPressのトップ画面が表示できることを確認します。
![]()
まとめ
とりあえず動く環境が欲しかったので適当に作ってみましたが、ローカルだとやっぱりちょっと手間ですね。
細かい部分もこれから詰めていきましょう。
[amazon_link asins=’4774190292′ template=’T-dilemma-Original’ store=’t-dilemma-22′ marketplace=’JP’ link_id=’f01bcc49-e312-11e8-bf56-99c8e90bf0e5′]